


Why are seamless graphics and textures such a big deal? Well, not only do they save us from pulling our hair out over mismatched patterns, but they also make our creative flow smoother. They bring a whole new level of convenience and practicality to our artistic process.
Seamless or tiled graphics can work wonders for digital artists, especially those who dabble in photobashing, matte painting, 3D sculpting or anyone in the designing, fashioning and illustrating game. But let's be honest: finding the perfect resource is no walk in the park.
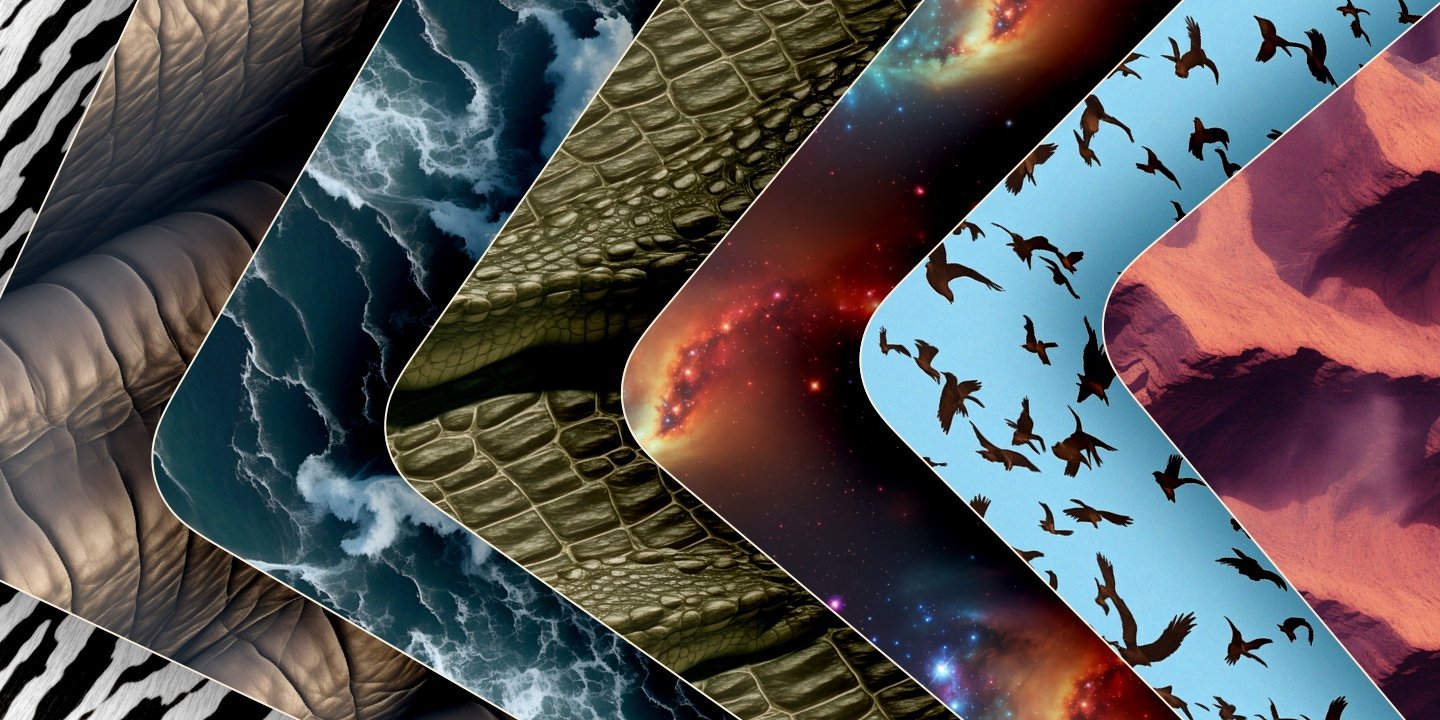
Designed with those seeking a top-notch selection of high-quality textures in mind, ArtyStack introduces its Graphics Collection. This image bank includes textures that are not only diverse (more fresh resources are en route!) and of excellent resolution, but they're also perfectly tileable! Whether you're working on a small project or a vast canvas, our textures are seamless patterns that fit any size, leaving no gaps and ensuring a flawless finish. You won't have to spark frustration over incomplete or cropped images anymore.
Making Patterns with Top-5 Applications
Having tileable artwork is a significant advantage, but knowing how to apply patterns in your day-to-day software is the missing piece you need to score big. Whether you're using ArtyStack Graphics or any other design with seamless attributes, here's how to easily create patterns in your preferred application.
Creating Patterns in Adobe Photoshop
- Open the image you want to use as pattern.
- Edit size and resolution if you need. Make sure that the canvas ratio is squared.
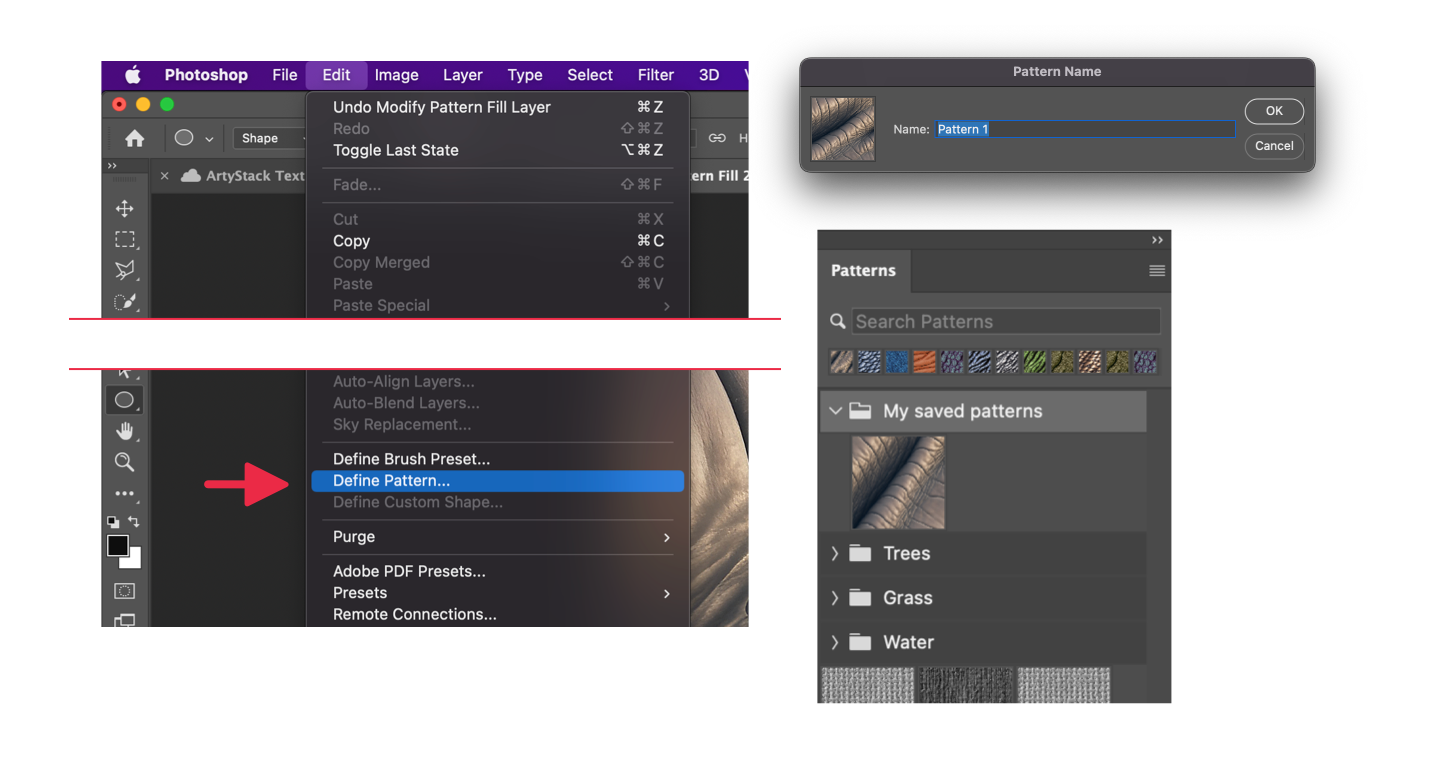
- Go to Menu › Edit › Define Pattern…
- Assign a name for your pattern and click OK.
- You can now find your new pattern image in the "Patterns" panel. If you don't see the panel, go to Menu › Window › Patterns.
Applying a Pattern
To apply the pattern to any file or canvas, you can do one of the following methods:

- At the bottom of the Layers panel, click on the "Create new fill or adjustment layer" icon and choose Pattern…
- Select the pattern and customize size and rotation.
- Drag the pattern thumbnail from the Patterns panel to your canvas. Select the pattern and customize size and rotation. The pattern layer will be placed as a Clipping Mask to the layer below.
- Add a new layer. Go to Menu › Edit › Fill… Select Contents: Pattern and choose your pattern in the Custom Pattern menu. Please note that this method will apply the pattern as a static, non-editable fill.
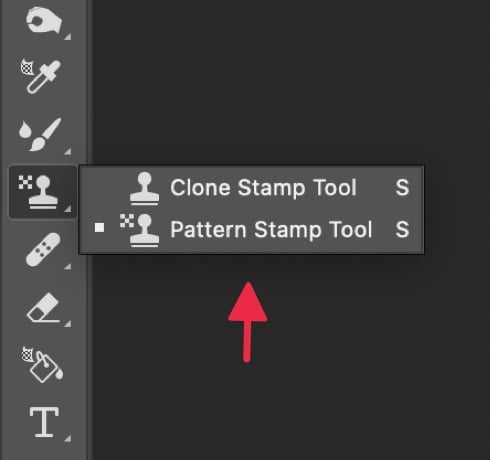
- Click the Pattern Stamp tool and select the brush settings and pattern you want to use in the toolbar. Paint brush strokes on regular layer. This method will also apply the pattern as a static, non-editable fill.
You can additionally apply a custom mask to a pattern. You may also rasterize pattern layers (Menu › Layer › Rasterize › Fill Content) to apply advanced transformations and/or distortions. Learn more about Photoshop patterns.
Creating Patterns in Adobe Illustrator
- Import your reference image to your document (drag and drop the file onto the document, or go to Menu › File › Place…).
- Adjust the image scale as needed.
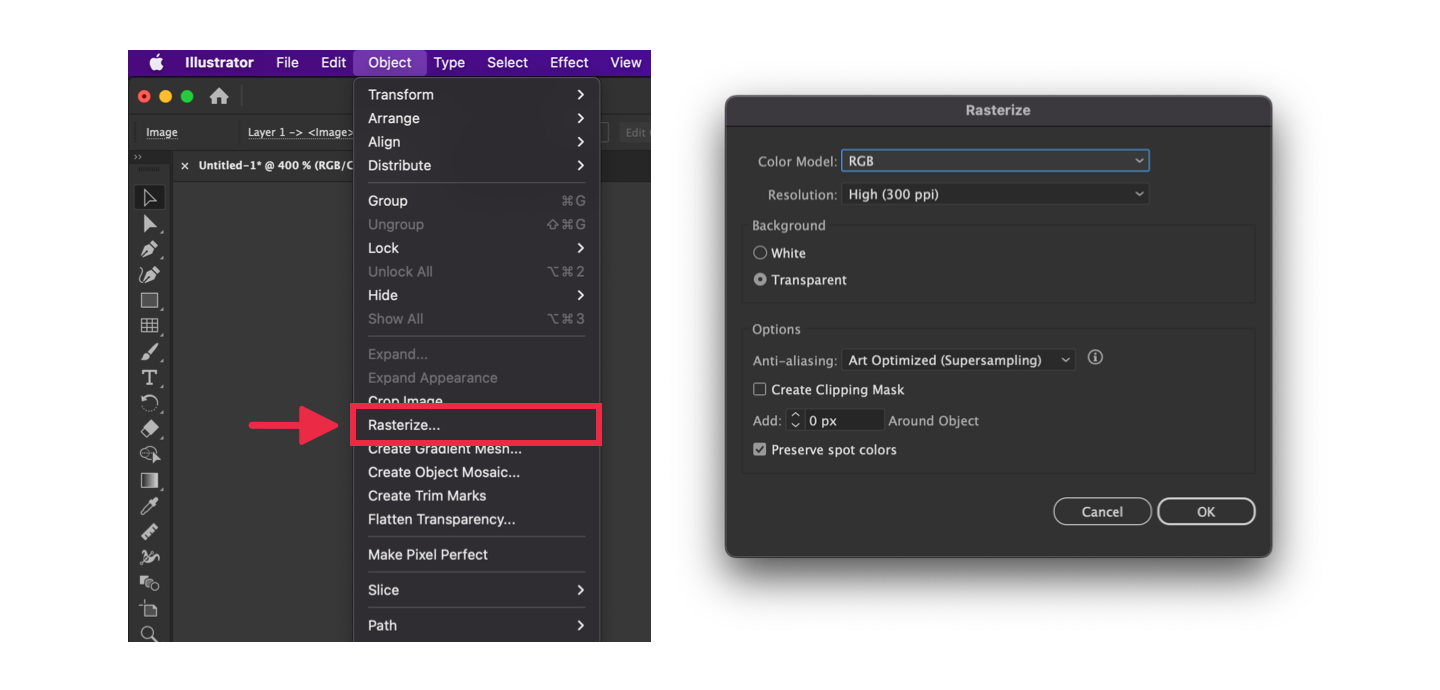
- As Illustrator cannot make patterns with imported files, you must rasterize the image. Go to Menu › Object › Rasterize…
- Set Color Model (RGB or CMYK), and Resolution as you need. Choose Transparent for Background and Art Optimized for Anti-aliasing. Click OK.
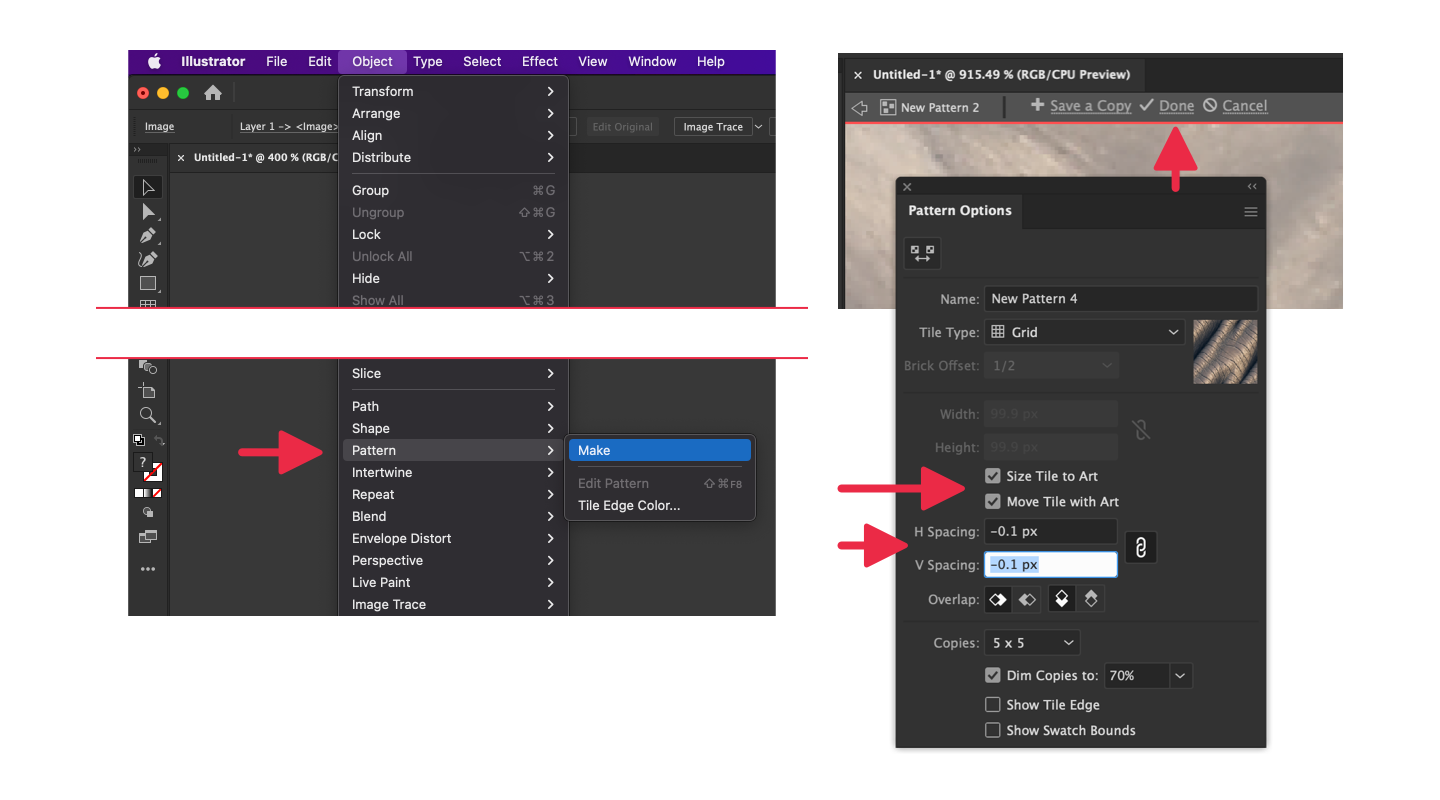
- Keep the rasterized image selected and go to Menu › Object › Pattern… › Make. You will be entering to the Pattern Editing Mode.
- The Pattern Options panel is visible, and the new pattern preview is turned on. Edit the Name and Tile Type as needed.
- Zoom in and check how your pattern tiling is looking. Sometimes rasterizing the image in Adobe Illustrator can cause its edges to become slightly blurry, resulting in a visible gap in the pattern preview. To hide this gap, enable the Size Tile to Art option. Now you can adjust the image tile overlap with the H Spacing and V Spacing. Here, you can use fractions (for example: 0.1 px).
- Once you are happy with the pattern appearance, click Done at the top-left of the document window.
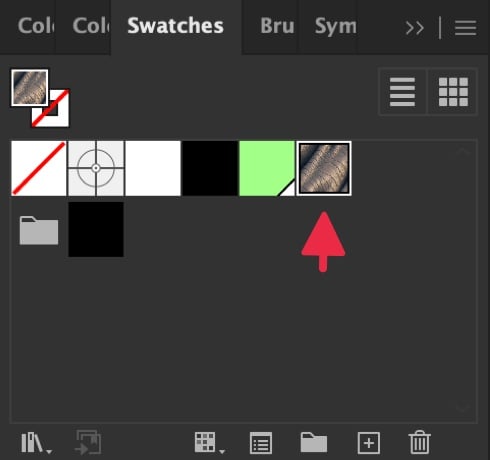
Now your texture is available as a pattern swatch within your Swatches panel. Apply this as a fill to any path, geometry or text. Learn more about Adobe Illustrator's pattern tool.
Creating Patterns in Affinity Designer
- Add a squared rectangle to your canvas with the Rectangle Tool [M].
- Make sure that the rectangle ratio is squared (let's say: 500 x 500 px).
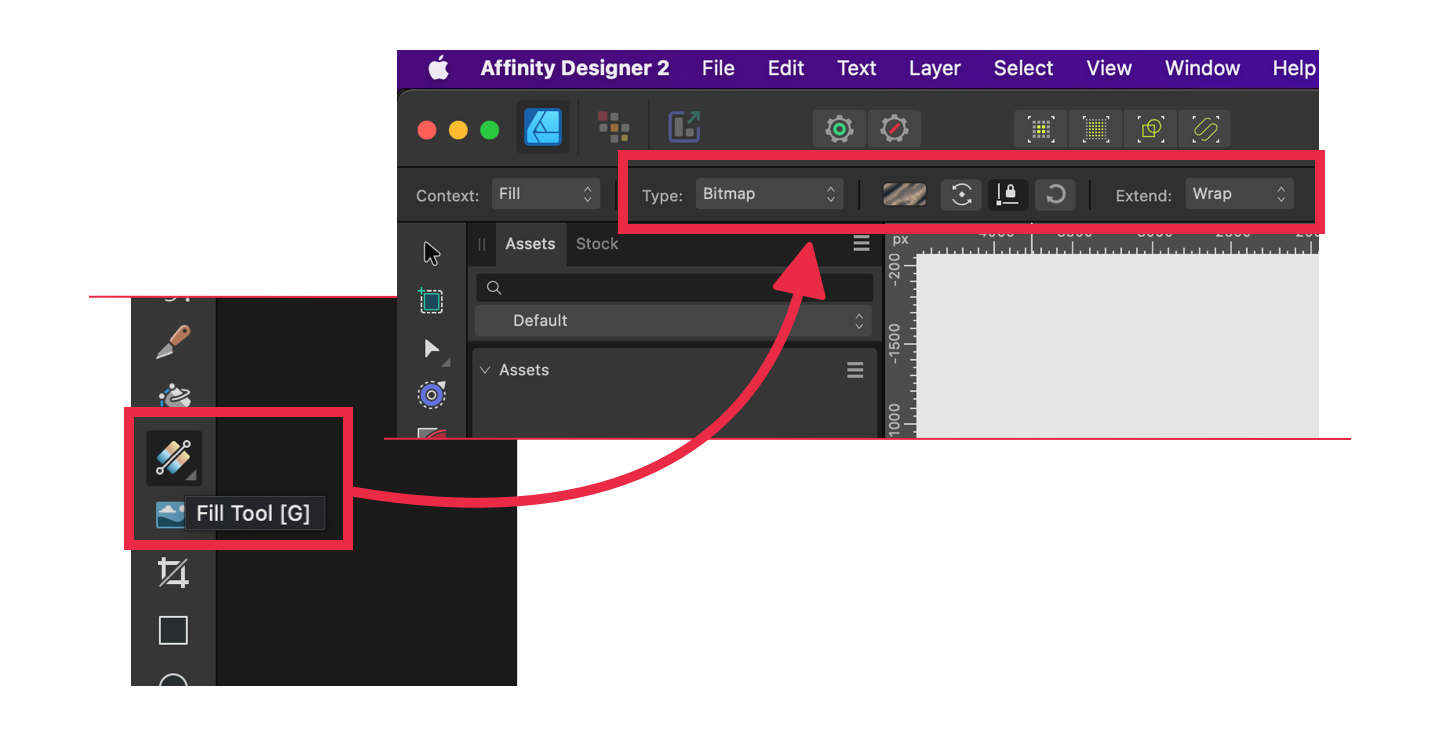
- Keep your rectangle selected and click the Fill Tool [G].
- Locate the visible context toolbar of your selected rectangle at the top of the window. Select Bitmap in the Type dropdown.
- Then Choose the image file you want to apply.
- Keep Extend option as Warp.
While the Fill Tool is active, you can also rescale and rotate bitmap fills for selected objects. Simply click the object and then the Fill Tool button. Customize the fill by using the context toolbar options and/or dragging the fill handles above the selected object.
To Save the Bitmap Fill:
- Open the Swatches panel.
- Click the dropdown menu and select Create Palette from Document › As Document Palette.
- With the rectangle selected, click the "Add current fill to palette" button in the Swatches panel.
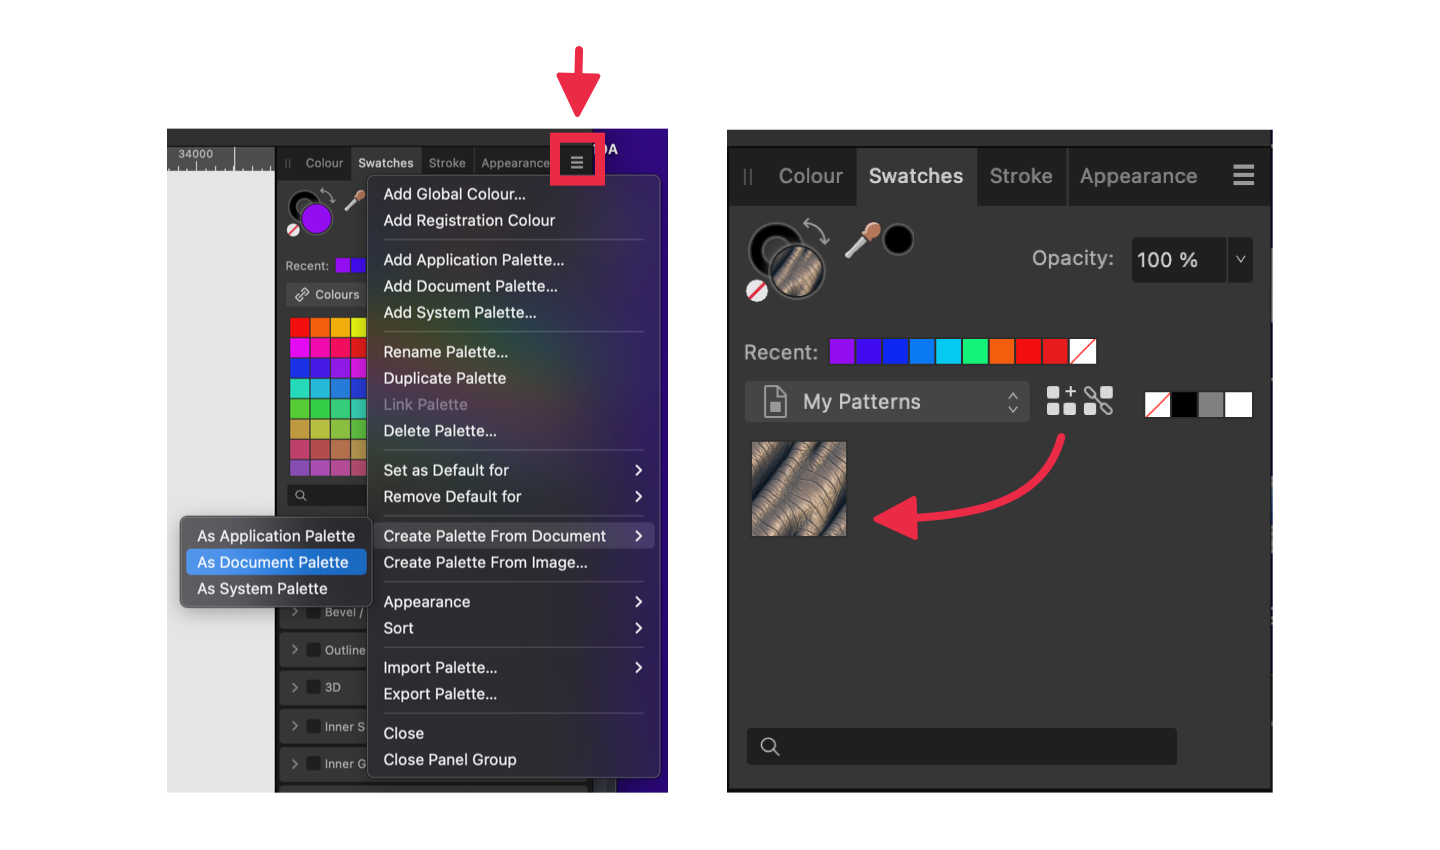
The texture has been transformed into a reusable pattern swatch, neatly saved in a new palette within the Swatches panel. You can apply it as a fill or stroke for paths, shapes, or text with ease! Learn more about Affinity Designer's fill tool and bitmap fills.
Creating Patterns in Affinity Photo
You can replicate exactly the same method used in Affinity Designer —outlined in the preceding paragraphs— to apply patterns to paths, geometries, texts and even image layers in Affinity Photo. But hey, there's actually another cool way to create tiled patterns in Affinity Photo. You can create Pattern Layers. Let us walk you through the steps for this method:
- Import your reference image to your Affinity Photo file (drag and drop the file onto the canvas, or go to Menu › File › Place…).
- Adjust the image scale as needed.
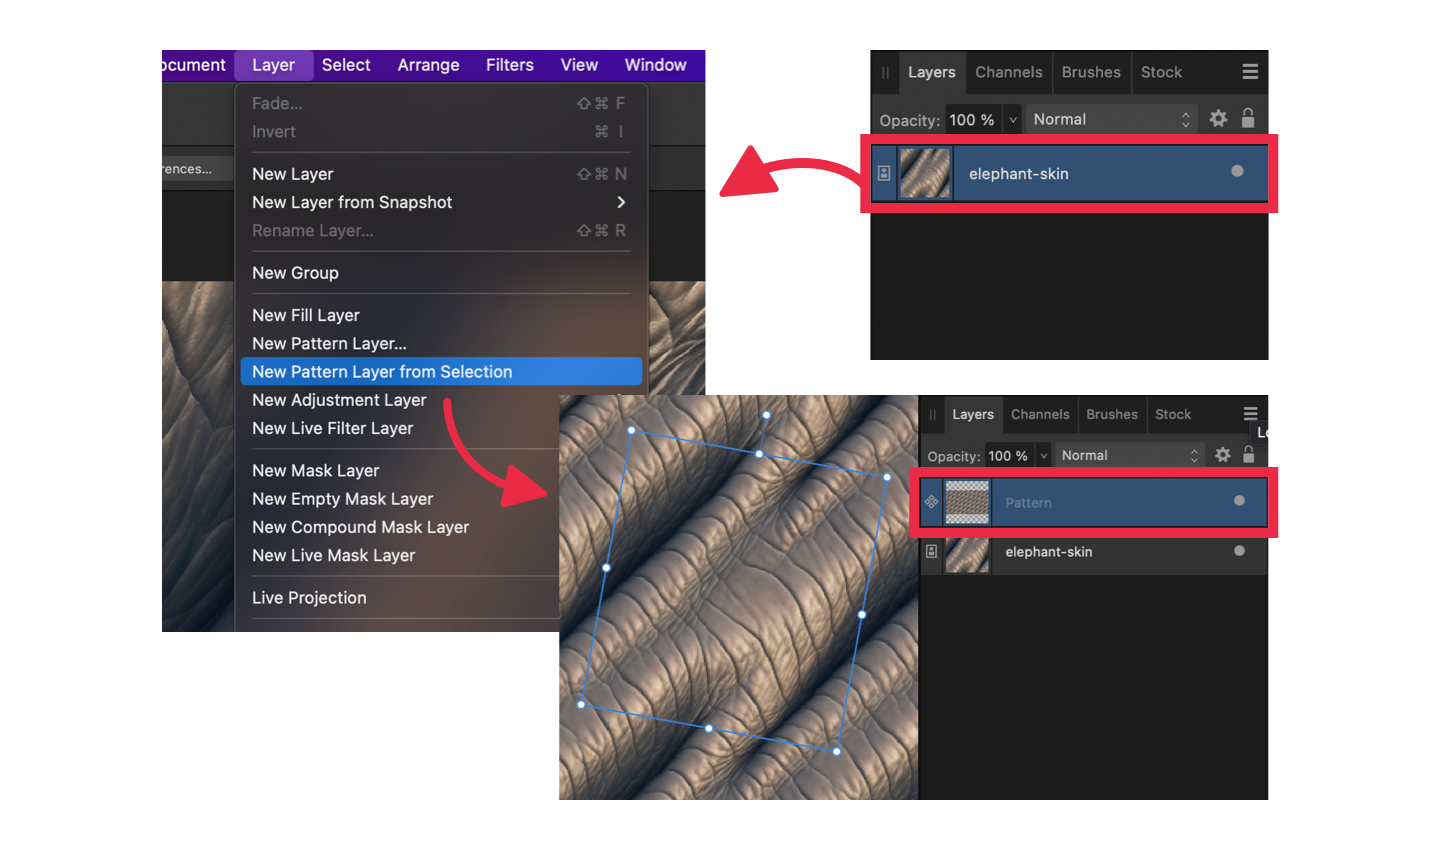
- Go to Menu › Layer › New Pattern Layer from Selection. A new Pattern Layer is created.
- Now you have full control over the pattern layer's appearance by dragging, rescaling, rotating, or shearing the bounding box of the single reference tile.
As long as you keep this layer as a Pattern Layer, you'll have the ability to transform the pattern's scale, shear or rotation. At any point, you can rasterize a Pattern Layer (meaning, convert it to a Pixel Layer), but once this change is made, you'll lose the ability to customize the pattern design. Learn more about Affinity Photo's pattern layers.
Creating Patterns with Clip Studio Paint
- Open the reference image you want to convert to a pattern.
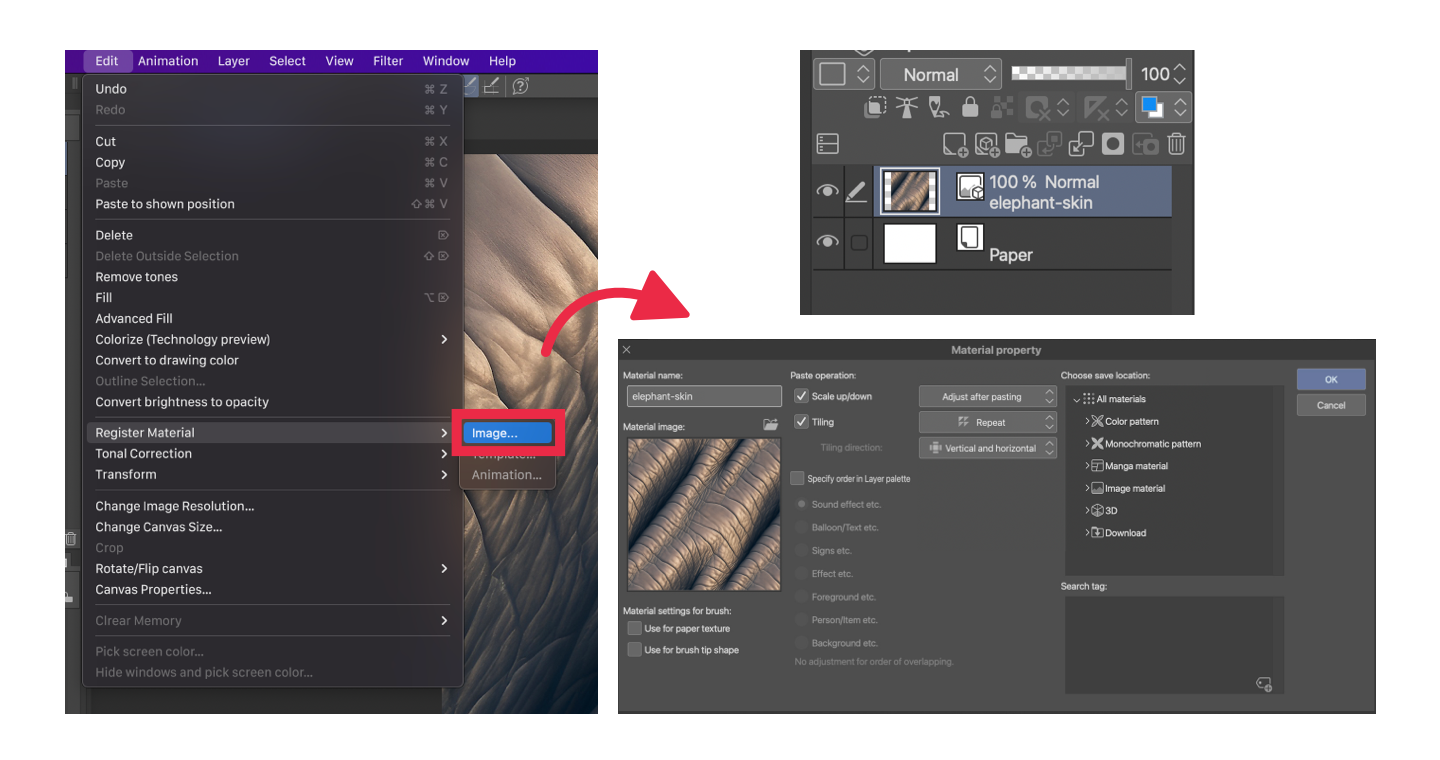
- Go to Menu › Edit › Register Material › Image…
- The Material property modal appears. Here you can check Scale up/down and Tiling, and make sure to select Adjust after painting, Repeat and Vertical and horizontal options.
- Toggle down All materials and select the location you'd like to save your pattern and include search tags for easily find the new material. Then click OK.
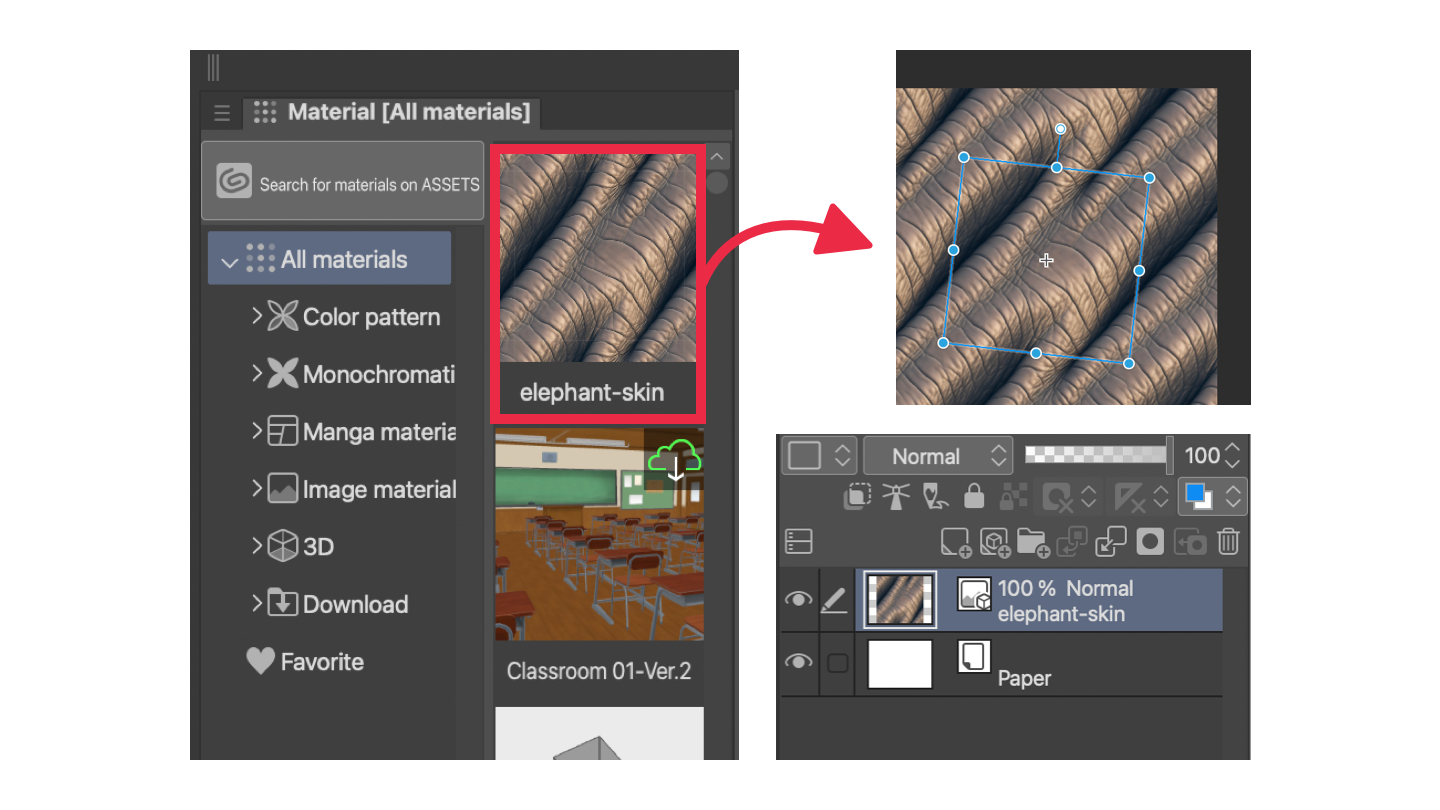
- If the Materials panel is not visible, go to Menu › Window › Material › … and choose the category you have used to save your new pattern.
- Drag and drop the pattern thumbnail to your canvas. A new layer is added and the material is placed within as a tiled pattern.
- Now you have full control over the pattern layer's appearance by dragging, rescaling or rotating the bounding box of the single reference tile.
As long as you keep this layer as a Material Layer, you'll have the ability to transform the pattern's scale and rotation. At any point, you can rasterize a Material Layer (meaning, convert it to a Pixel Layer), but once this change is made, you'll lose the ability to customize the pattern design. Learn more about Clip Studio patterns.
Final Recommendations
No matter what software you are using, take these recommendations into consideration:
- To achieve the best results when creating patterns with pixel-based images, ensure that the reference image's size and/or position are whole numbers. For example, use 500 x 500 pixels for dimensions instead of 499.25 x 501.15 pixels, and set X and Y values to 20 x 40 pixels instead of 20.3 x 39.6 pixels. Using whole numbers for images will help you achieve crisper patterns and avoid blurry edges or gaps between tiles.
- No matter how perfect and harmonious a pattern may be, it loses its effectiveness when applied at a very small scale. While patterns are highly practical, repeating them at close distances can give an artificial and monotonous appearance. Always aim for a balance between composition and scale to achieve an effective aesthetic.
- If the intention is to apply a volumetric texture, as in techniques like photobashing or matte painting, it's a good idea to apply transformations, perspectives, or distortions (e.g., using Liquify tools) to add realism to the surface. Additionally, use lighting and shadows to enhance the realism of your texture.
- If you wish, you can also find Texture Bundles on ArtyStack (coming soon), where we include several of our textures ready to be used as patterns right into your favorite software.
- Never stop enjoying the process. Often, the best ideas come from experimenting with a free and creative spirit.
I hope you find this article helpful. Feel free to share your thoughts in the comments section below. And don't forget to make great artworks with great art supplies!

This publication is brought to you by ArtyStack. Explore our resources.


Comments ()